Can seamer machine is a kind of packaging machine. It is crucial in various industries, particularly food and beverage packaging. The primary function of a can seamer machine is to create a secure and airtight seal between the lid and the can body. This seal prevents contaminants, air, and moisture from entering the can, thereby preserving the freshness and quality of the packaged contents. Without proper sealing, products could spoil and then lead to potential health hazards and economic losses.
For industries like the food and beverage sector, maintaining the safety of packaged products is paramount. A can seamer machine ensures the packaging is tamper-proof and prevents unauthorized access to the contents. This is especially important for perishable goods and products that require strict quality control.
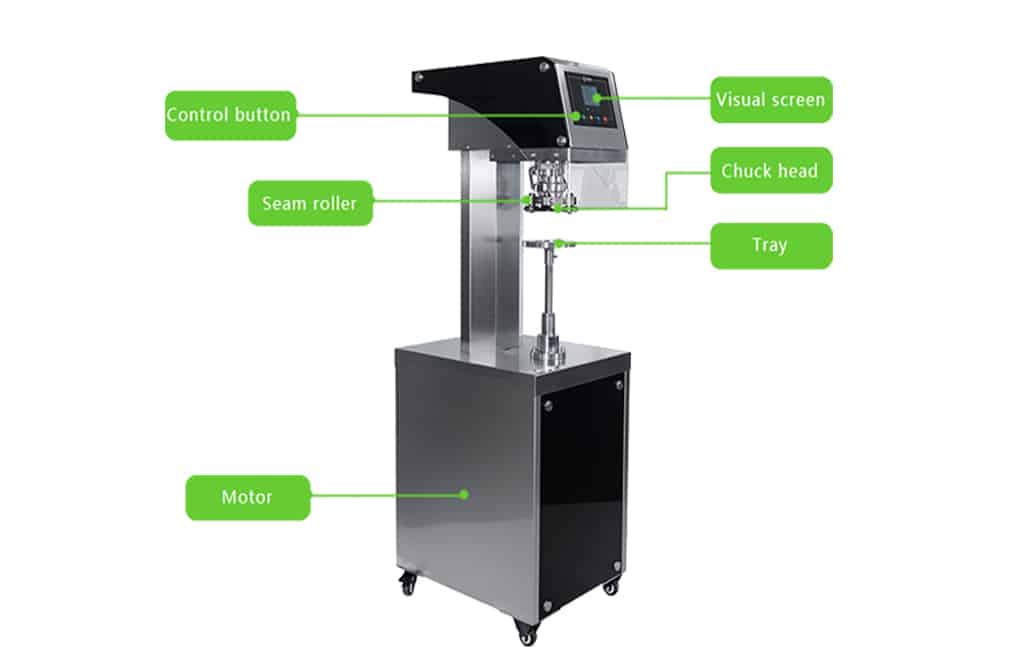
The Main Structure of the Can Seamer Machine
The main structure of a can seamer machine consists of several key components. Here’s an overview of the main components:
- Base Frame: The base frame provides stability and support for the entire machine with sturdy materials.
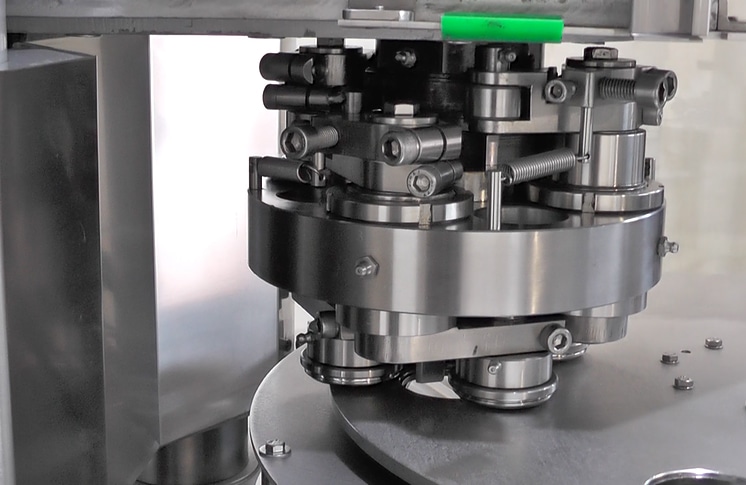
- Seaming Head: The seaming head is the core component, and it is responsible for creating the seal between the lid and the can body. It consists of seaming rolls that press the lid against the can flange to form the seam.
- Seaming Rolls: Seaming rolls are pairs of specially designed rotating wheels that shape and compress the can lid and body to create a secure seam.
- Lid Feeding System: The lid feeding system ensures a continuous supply of lids to the seaming station.
- Can Handling Mechanism: Handling mechanism positions the cans under the seaming head, transport them between different stations, and ensures proper seal alignment.
- Pressure Adjustment Mechanism: This mechanism allows operators to adjust the pressure applied by the seaming rolls.
- Seaming Control System: Modern can seamer machines often incorporate electronic control systems that allow operators to adjust and monitor various parameters.
- Safety Features: Safety guards and sensors integrate to protect operators from moving parts and prevent accidents.
- Lubrication System: A lubrication system is often implemented to ensure smooth operation and reduce friction between moving parts.
- Conveyor System: A conveyor system transports cans to and from the seaming station in larger production setups.
- Hopper and Feeder: In manual or semi-automatic machines, a hopper, and feeder manually load cans onto the conveyor system.
- Power Source and Drive Mechanism: The machine is powered by an electric motor that drives various components through gears, chains, or belts.
How to Adjust the Can Seamer Machine?
Adjusting a can seamer machine is crucial to ensure proper sealing and efficient operation. Here’s a step-by-step guide on how to adjust a can seamer machine:
- Safety Precautions: Before making any adjustments, please turn off the machine and disconnect the power source. Wear appropriate personal protective equipment (PPE) to prevent accidents.
- Gather Necessary Tools: Collect the tools required for adjustments, such as wrenches, screwdrivers, and measurement tools.
- Check the Manual: Refer to the machine’s user manual or manufacturer’s instructions for guidance on adjustments.
- Head Height Adjustment: Raise the can seamer’s head up. And then adjust the head height to match the can size. Finally, tighten the head adjustment bolts to secure the new height.
- Seaming Rolls Adjustment: Examine the seaming rolls for wear or damage first. Then adjust the rolls’ positions based on the can size. Check the seam thickness by performing a test seam on a scrap can.
- Lid Placement: Adjust the lid chute to ensure lids are properly placed on the cans before sealing. Make sure the lids are centered over the cans for even sealing.
- Lubrication: Ensure all moving parts are well-lubricated according to the manufacturer’s recommendations.
- Sealing Pressure: Adjust the sealing pressure according to the tank material and size. And test the sealing quality by checking the seams of the sample tanks.
- Speed Adjustment: Make adjustments to the machine’s speed to match the production requirements and can size.
- Test Runs: After making adjustments, run a few test cans through the machine to ensure the adjustments are working effectively.
- Fine-Tuning: If necessary, fine-tune the adjustments based on the test runs’ results.
- Record Keeping: Keep a record of the adjustments made, including can size, pressure settings, speed, and any other relevant parameters.
How to Use the Can Seamer Machine
Using a can seamer machine effectively requires careful setup, proper adjustments, and adherence to safety procedures. Here’s a step-by-step guide on how to use a can seamer machine:
- Safety Precautions: Put on appropriate personal protective equipment (PPE). Ensure the machine is properly grounded and the power source is disconnected before starting.
- Preparation: Set up the machine on a stable surface with adequate space for operation. Ensure all the correct lids, cans, and accessories are ready.
- Adjustments: Consult the machine’s manual for specific can size, lid type, and seam thickness adjustments.
- Lid Placement: Load the lids into the lid feeder according to the manufacturer’s instructions.
- Loading Cans: Place the cans onto the machine’s conveyor system or hopper, depending on the machine type.
- Starting the Machine: Turn on the machine’s power source. Initiate the machine’s operation using the control panel or designated controls.
- Sealing Process: The seaming rolls will engage the lids and can flanges as the cans move through the machine. The rolls will shape and compress the lids and cans to create a secure seal.
- Inspection: After sealing, visually inspect the seams to ensure they are consistent and secure.
- Fine-Tuning and Testing: If necessary, make minor adjustments to the machine’s settings to optimize seam quality.
- Collection and Disposal: Collect the sealed cans as they exit the machine. Dispose of any scrap or defective cans according to waste disposal guidelines.
- Maintenance: Regularly clean and lubricate the machine per the manufacturer’s recommendations. Keep a maintenance log and perform routine checks.
- Shutdown: After completing the can sealing process, turn off the machine’s power source. Disconnect the machine from the power outlet.
- Cleanup: Clean the machine, removing any debris or residue. Store the machine and its components properly to prevent damage.
Conclusion
The precise and consistent operation of modern can seamer machines eliminates seal quality issues that can arise with manual sealing methods. The effective seal of the can seamer machine significantly extends the product’s shelf life.
A well-sealed can contribute to a positive brand image and consumer perception. A secure seal means quality, safety, and attention to detail, enhancing customer trust and loyalty. Its role in modern packaging processes is fundamental to delivering safe and appealing consumer products.